I remember the very first time I sat down to build a Metal Earth model. The immediate problem you face is “How do I get these little pieces off the sheet?” With a bit of trial and error, you eventually figure out a way, but if you speak to more experienced builders you’ll discover that there are some favored methods to remove Metal Earth pieces safely. So let’s get into that …
How do you remove Metal Earth pieces without damaging them? The best method I have found is using a tool called a single lever action sprue cutter. The narrow cutting tips of this modeling tool are purposely designed for getting into very small gaps and removing parts.
Surprisingly, though, a lot of metal kit modelers don’t know about sprue cutters. They use other methods – which, for the most part, work just fine.
So, let me list the 5 most popular methods, and then compare them with my technique using a sprue cutter:
1. The Wiggle Method
Just as the name implies, this method simply involves grabbing the part between your fingers, and wiggling it back and forth until the metal breaks at the point where it’s joined to the sheet.
This sounds like a very unsophisticated beginner method, but it is actually surprisingly effective! When you’re able to use this technique, you’ll find that it usually leaves you with a very clean break, which is exactly what you want.
There are, however, a couple of problems with it …
First, it requires patience. Some of those little Metal Earth parts can be amazingly stubborn and require wiggling for a while. This is especially true when you aren’t able to move the part very freely because of how it’s joined to the sheet. And when you then have to repeat this process over and over with lots of parts for a build, it can get quite tedious.
Second, getting your fingers positioned around a tiny part that’s surrounded by metal, with only small gaps, can be tricky indeed.
But for those times when you can wiggle with ease … do it! It works fine.
2. Wire Clippers
This is the method that the Metal Earth company themselves recommend. Wire clippers are one of three items in their essential tool kit. They’re basically a small set of the kind of cutters that electricians carry.
[If you’d like to see the specific tools I recommend, and the very best sources to get them from, CLICK HERE to check out my “Best Tools” page]
They are sharp and work very well, of course, for snipping through the soft metal found in these kits. The only problem is that they can sometimes be difficult to get into the tight spots on the parts sheet. Which is why I prefer the sprue cutters we’ll talk about shortly.
But a set of wire cutters is certainly one tool you’re going to find handy to have around.
3. Cuticle Cutters
There may well be a pair of these in the bathroom of your home. People use them to snip back the skin around their fingernails during a manicure.
I’ve heard rave reviews about cuticle cutters as a tool to very efficiently remove Metal Earth pieces from their sheets. But I’ll have to take the word of others on this, because I honestly haven’t tried them for myself.
Quick Tip: If you’re going to try cuticle cutters, DON’T “borrow” your wife’s set. They are designed to cut very soft skin and, over time, using them on metal can tend to damage or blunt them. And that’s no way to get the Mrs. on board with your new hobby!
Along the same lines, and from the same bathroom bag …
4. Nail Clippers
Now, these I have tried, and I can vouch for the fact that they will give you a very accurate trim. They’re also an excellent tool for cleaning up any ragged edges on parts that have already been removed by one of the other methods.
Again, however, because of their shape, they are a tool that you’ll find difficult to get into some tight spots. They’re another great tool to have on your bench, but not one that you’ll reach for first.
Quick Tip: Nail clippers usually have a small fold out nail file in them. These will work okay for filing off small metal burrs if you don’t have another fine metal file.
[CLICK HERE to check out my “Best Tools” page]
5. A Hobby Knife
Some kit builders like to stick with this proven and versatile tool that has a thousand uses for all kinds of hobbyists. I’m referring to the Exacto style of knife that uses razor sharp disposable blades. Which is one of the reasons they’re such a popular tool — it’s cheap and easy to change out these disposable blades as often as you need to. So you never risk damaging a more expensive tool that then needs to be replaced.
Now, if you want to give this method a try, you will need to get some #10 blades. That’s a rounded blade, and the way you will use them is to “rock” the blade back and forth several times on the joint that you want to cut.
Caution: While a few people are most comfortable with this method, and get to be very good at it, the beginner should know that, of all the methods, it carries the greatest risk of bending and damaging the parts. This is because it requires quite a bit of downward pressure on the metal sheet.
So, if you’re going to try this method, lay the metal sheet on a very hard surface to support it. (And, of course, do be really careful, as these blades are extremely sharp.)
Which brings us to my preferred tool …
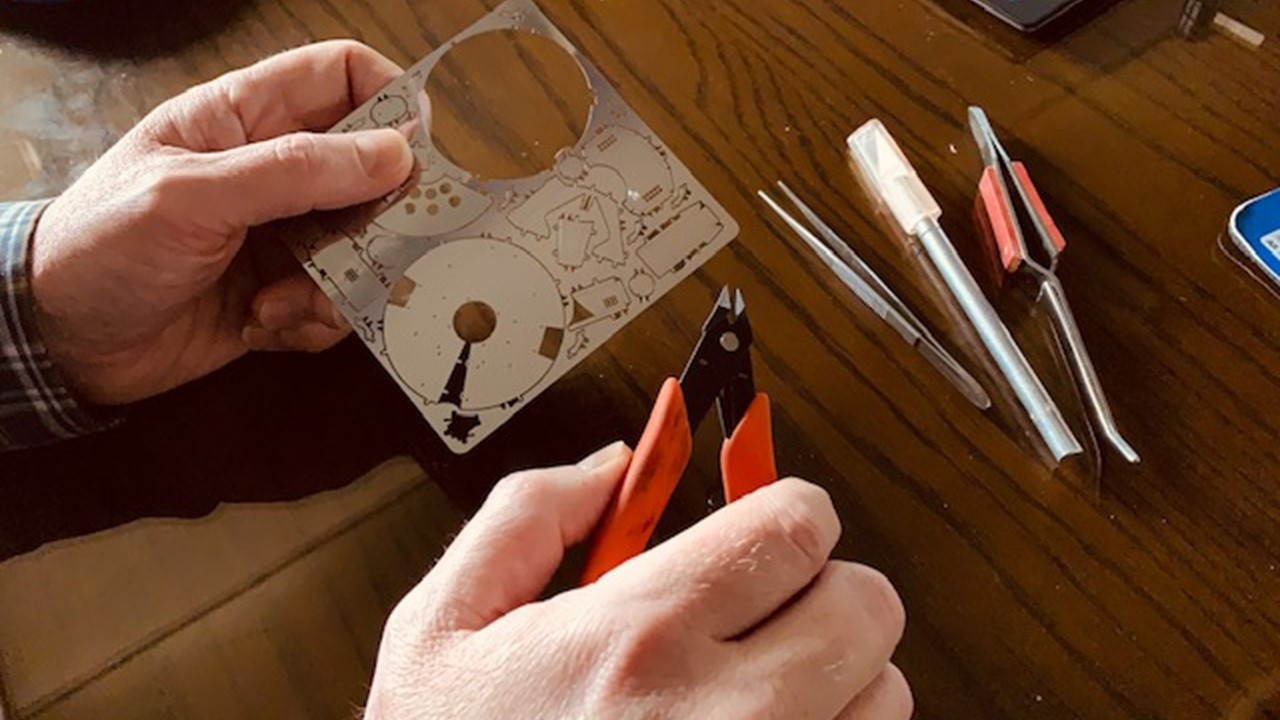
6. Sprue Cutters
Specifically, a single lever action sprue cutter.
If you pick up a set of these, the first thing you will notice is that they look quite similar to wire clippers, but with the benefit of smaller, pointier, much narrower cutting edges. They were designed specifically by plastic kit modelers for getting into tight spaces and removing parts from their “sprues” (hence the name).
They were the natural tool of choice for me, because I was so familiar with them. My other passion (before discovering Metal Earth) was years of building model aircraft from plastic kits.
So, how do I use them?
My 3-Step Technique
I use this technique about 90% of the time to remove Metal Earth pieces …
Step 1: I locate the part that I need to remove, and use my sprue cutter to carefully snip it where it is joined to the metal sheet ON ONE SIDE ONLY. This often means one single cut, but sometimes a couple may be required depending on the size of the part and how many joints it has connecting it to the sheet. The goal is to free the part completely on one side.
Step 2: I then use my fingers and “the wiggle method” (see method 1 above) to remove the rest of the part from the sheet. With one side already cut, this becomes much easier to do. The benefit is that the wiggle method really does give you a nice clean separation with minimal extra unwanted material (or “burr”) left on the part.
Step 3: Finally, I use a small, fine metal file to remove any remaining burr that’s left on the part. This is the way to get the nicest finish on your Metal Earth model.
Quick Tip: When using a metal file to remove any burr, file longways down the edge of the part and not across it, causing it to “vibrate”. This will help ensure that you don’t inadvertently bend the part while you’re cleaning it up.
So, there you have it. That’s how to remove Metal Earth pieces safely. I do hope this article has been informative for you, and let me encourage you to maybe give my method a try. If you find that it does work for you, I’d love to hear about it. The things that I’m sharing on this site are those that have increased my enjoyment of building these wonderful kits.
[You might also like to read my article: “5 Essentials for Your Metal Earth Tool Kit (and 7 More It’s Nice to Have)”]
Over to you …
Do you use one of these methods that I’ve mentioned, or do have another way of doing it? Share YOUR tip in the comments below for the benefit of all.
Happy bending!

Good advice thank you. But still ambiguous, I bought mini scisors for ladies eyebrows and flat tweezers. I dont know where to cut the pieces, what line or guide should I follow?
Hi Mark,
On each piece, you’re looking for the small tab(s) that look like an arrowhead. The thin end connects to the part you are removing. Snip as close as you can to that end … flush with the part itself. Some parts only have one connector tab, but most will have at least a couple. Very large parts may have more.
Hope that helps. Happy bending!