
I’ve been building 3D laser cut metal models for a couple of years now, and as I’ve gained experience (thankfully) I have reduced the frequency of those frustrating “mishaps”. But it still happens from time to time that I break a piece, usually along a fold line. I think even the most experienced builder will, occasionally, have to know how to repair metal earth models. Models can even get broken later, while on display.
How can you repair Metal Earth models? The most common method of repair is to use super glue (cyanoacrylate). Bonding two metal pieces back together requires that you apply a thin layer of the glue and hold the pieces together with no gaps for a longer time than you would for other materials.
That’s the short answer. There’s more to say about that, and I have some other suggestions that I hope will help you.
First …
Using Super Glue to Repair Metal Earth Models
This is the “go to” method for most modelers, most of the time.
But it’s not just a case of pick up a tube and squeeze. It’s really helpful to understand a bit about super glues (or cyanoacrylates, to use their scientific name) so you use them correctly.
Cyanocrylates are a family of strong, typically very fast-acting adhesives that have industrial, medical, and household uses. Here are the most important points for Metal Earth modelers to know …
- Super glue has a short shelf life. Even if you never open the tube or bottle, they may only last about one year after manufacture. Once you have opened the container, that life can drop down to as low as one month. I have found that a tube can last quite a bit longer than that, but it’s not uncommon to reach for your glue and discover it’s no longer useable. So, here’s the tip: DON’T buy it in bulk, and be prepared to buy a new tube regularly (fortunately it’s cheap stuff). And you can also extend it’s usable life by storing it in an airtight container with a package of silica gel desiccant.
- You should apply it sparingly. The chemical reactions that cause cyanocrylates to set rapidly are affected by regular levels of humidity. It causes a thin skin to begin forming in seconds which slows down the reactions. Sometimes people think, “I want a strong bond, and I want it to ‘grab’ quickly, so I’ll apply more glue”. This is exactly the WRONG thing to do. It achieves the opposite effect. Applying more will tend to take much longer to set, and not be as strong.
- Hold the metal pieces you are gluing in place for longer. Cyanoacrylates work differently with various materials. They will bond some plastics instantaneously. Glass, on the other hand, is almost impossible to bond properly. When it comes to bonding metal to metal, you are going to need to hold the pieces together a bit longer than other materials. Don’t expect the bond in seconds. Usually, the initial bond is made after about a full minute, but it is best to set your model aside and let the glue cure for a while – even overnight if you can.
- Don’t allow gaps. The process works best when the metal surfaces fit closely together without any gaps at all. Any space can interfere with how secure your final bond is.
Pitfalls to Avoid When Using Super Glue
- Glue prints. If you get your fingers in the wrong place and press the glue while it’s setting, you may find an ugly fingerprint on the surface of your model that you’ll never be able to remove.
- Gluing your fingers together. Most of us have done this at one time or another, so it’s best to use some sort of applicator (a paper clip works great). If your skin does become bonded by super glue, soaking in or swabbing with warm soapy water is the best way to soften the glue. Adding some vinegar to the solution can also help.
- Toxicity. Cyanoacrylates are toxic, and you want to avoid breathing in the fumes. So, only ever use it in a well-ventilated area.
Which One to Buy?
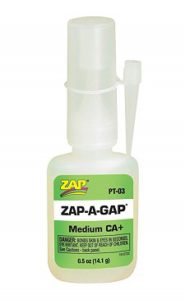 My preferred brand of superglue is Zap-a-gap Medium CA+ (click here to see it on Amazon). I just find it performs well, is easy to apply, and seems to have a little better shelf life than others. Zap-a-gap also produce an excellent matching “activator” in a spray can, called Zip-Kicker. When you apply the glue, you just spray a very short burst of the activator and it accelerates the curing time. This is especially helpful in the case of metal on metal.
Another preferred brand for metal modelers is Loctite. This is the original brand of superglue. These days it has squeeze buttons on the side of the tube for more control, which many people love.
Then there are some brands that are “UV activated”. Some come with a small UV flashlight right in the box. This works as another kind of activator. If you want to try this type, check out Laser Bond, 5-Second Fix or Bondic.
Try Aluminum Tape to Repair Metal Models
This has limited applications, but is another idea to consider. If the break is to a part that will not be seen on the final model, because it is internal or will be hidden behind other parts, you can try taping it. Aluminum tape is almost the identical color as a Metal Earth model.
[If you’d like to see the specific tools I recommend, and the very best sources to get them from, CLICK HERE to check out my “Best Tools” page]
Need Another Solution?
- If you snap off a tab, don’t attempt to reattach it. First, they’re usually tiny, so it’s way too fiddly to do. And also, you will then have to bend the tab again after repair, so it’s very likely to break again. The better course of action is to simply glue together the two parts that would have been held by the tab.
- If all else fails … the Metal Earth company (Fascinations Inc) has grown an excellent reputation for customer service. And modelers regularly report that they emailed the company for help, and quickly received a replacement sheet free of charge. We don’t want to overwhelm them with requests like this, but if you’re really stuck, it’s better than throwing out a model kit. Of course, we can’t vouch for similar service from other brands.
Preventing Breaks in the First Place
- Bending a fold twice is about the limit. Just expect that after that it is going to break. So just be careful to ensure that that you’re making the correct fold at the right time before you proceed.
- Read ahead on the instructions. This is a BIG tip. Generally the instructions provided are good, but sometimes the order that they tell you to follow makes construction much harder – even almost impossible. For example … Metal Earth’s F4U Corsair (which carries an “easy” rating). If you follow the instructions to the letter, it’s virtually unbuildable! The instructions tell you to bend the fuselage into shape and close the tab in step 1. But then in the following steps it tells you to attach more parts that have tabs needing to be closed INSIDE the (now closed) fuselage. By reading ahead, you can spot this and hold off on closing the fuselage in step 1.
- Before you begin construction, search for a build report online. Just type in the name of the model you want to build and see if someone has posted their experience with it. It could be either a blog post or a YouTube video. They can alert you to problems you might face in construction.
Build reports are still quite limited, but our hobby is growing quickly and I suspect this will change over the next couple of years. Watch our site!
[Want to write a build report for us? We want to hear from you. Click here for info.]
A Final Word
So, I hope this has been a really helpful resource for those times when you have to repair Metal Earth models. (And I sincerely hope that’s not too often!)
But I get it. Breakages can be really frustrating. You might feel like throwing that half-assembled Metal Earth model in the trash and never buying another one.
I want to encourage you not to. Don’t give up. Take a break, and then reconsider your options.
The more 3d metal models you build, the less of these problems you should have. You’ll learn how not to break parts as often. But I assure you that even really experienced modelers still have things go wrong.
Do you have another tip to add? Leave a comment below.

Hi
So I had it break on a fold.
I clipped out a piece of aluminum that’s left over once all the pieces are removed from the main sheet. I was then able to brace it with super glue. And best of all I could bend it again.
How do you avoid that haze that you sometimes get using cyanoacrylate? As this would blemish the gloss finish.
Mostly I use 2-5 minute epoxy
Sorry I didn’t see this before now, Steven. It certainly CAN blemish the finish. So, all I can tell you is that, in the words of Elmer Fudd, you need to be vewy, vewy caweful. IF you do get a spot of glue on the finish, DON’T try to wipe it off. You’ll make it much worse. Wait until it is very hard, and then you might be able to carefully slice it off with a sharp hobby knife.
Hope that helps. Happy bending!